We only get three built-in content types at the backend when we install WordPress, i.e., posts, pages, and media. However, today WordPress has become quite flexible and advanced.
The approach to adding more post types also has expanded. The diversified usage demands more content types because posts, pages, and media are not enough, and here is where WordPress custom post type comes in handy.
What Is a WordPress Custom Post Type?
Custom post types are used to convert a regular WordPress website into a content management system. As the name suggests, you can use custom post types to create various content types for your website.
Besides that, one can find several post types available by default in WordPress installation, including:
- Post – blog post
- Page – static page
- Attachment – attached media
- Revision – post revision
- Navigation Menu – nav menu
- WordPress supports an unlimited number of Custom Post Types. You can create your custom posts and call them up wherever you want.
- For example, if you run a News website and want to add a custom post type titled “News.” Once created, the news post-type would have its own menu in the WordPress dashboard admin area. Additionally, you can create multiple post types, such as Movies, Portfolios, etc.
What Is a WordPress Custom Post Type?
Custom post types are used to convert a regular WordPress website into a content management system. As the name suggests, you can use custom post types to create various content types for your website.
Besides that, one can find several post types available by default in WordPress installation, including:
- Post – blog post
- Page – static page
- Attachment – attached media
- Revision – post revision
- Navigation Menu – nav menu
WordPress supports an unlimited number of Custom Post Types. You can create your custom posts and call them up wherever you want.
For example, if you run a News website and want to add a custom post type titled “News.” Once created, the news post-type would have its own menu in the WordPress dashboard admin area. Additionally, you can create multiple post types, such as Movies, Portfolios, etc.
Follow the steps below to create a custom post type on a WordPress website:
- Navigate to the function.php file from your WordPress theme directory
- Add the following code to the function.php file
- /* Custom Post Type Start */
- function create_posttype() {
- register_post_type( 'news',
- // CPT Options
- array(
- 'labels' => array(
- 'name' => __( 'news' ),
- 'singular_name' => __( 'News' )
- ),
- 'public' => true,
- 'has_archive' => false,
- 'rewrite' => array('slug' => 'news'),
- )
- );
- }
- // Hooking up our function to theme setup
- add_action( 'init', 'create_posttype' );
- /* Custom Post Type End */
- Once you’ve added the code, the News post-type will automatically appear in the admin area
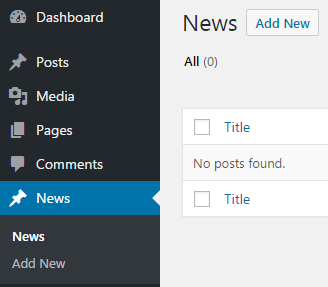
- When creating custom post types, it is necessary to use init for the hook in add_action(), and the register_post_type() function will take the arguments
- /*Custom Post type start*/
- function cw_post_type_news() {
- $supports = array(
- 'title', // post title
- 'editor', // post content
- 'author', // post author
- 'thumbnail', // featured images
- 'excerpt', // post excerpt
- 'custom-fields', // custom fields
- 'comments', // post comments
- 'revisions', // post revisions
- 'post-formats', // post formats
- );
- $labels = array(
- 'name' => _x('news', 'plural'),
- 'singular_name' => _x('news', 'singular'),
- 'menu_name' => _x('news', 'admin menu'),
- 'name_admin_bar' => _x('news', 'admin bar'),
- 'add_new' => _x('Add New', 'add new'),
- 'add_new_item' => __('Add New news'),
- 'new_item' => __('New news'),
- 'edit_item' => __('Edit news'),
- 'view_item' => __('View news'),
- 'all_items' => __('All news'),
- 'search_items' => __('Search news'),
- 'not_found' => __('No news found.'),
- );
- $args = array(
- 'supports' => $supports,
- 'labels' => $labels,
- 'public' => true,
- 'query_var' => true,
- 'rewrite' => array('slug' => 'news'),
- 'has_archive' => true,
- 'hierarchical' => false,
- );
- register_post_type('news', $args);
- }
- add_action('init', 'cw_post_type_news');
- /*Custom Post type end*/
$supports: Specifies that the post type is compatible and supports all essential features.
$labels: Specifies that the post type is referred correctly to the admin area.
$args: Specifies a permalink slug of the news and a menu position located just beneath the Posts menu.
Now let’s take a look at before and after adding custom post features to our WordPress website.
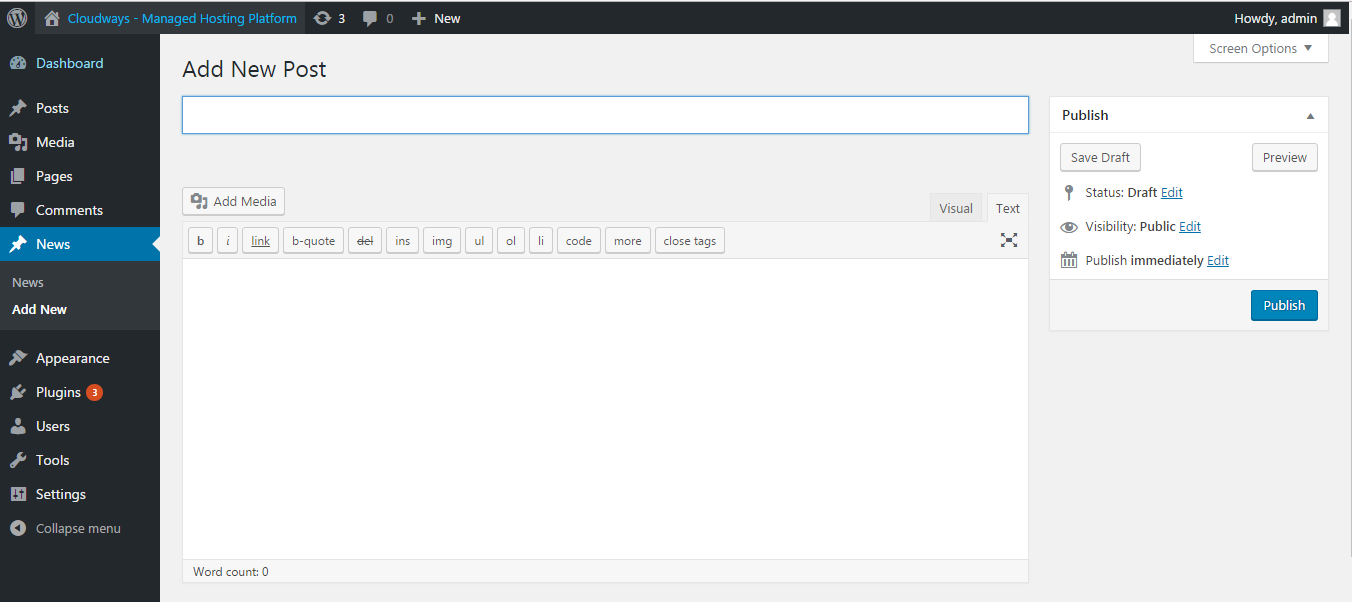
– Before adding features
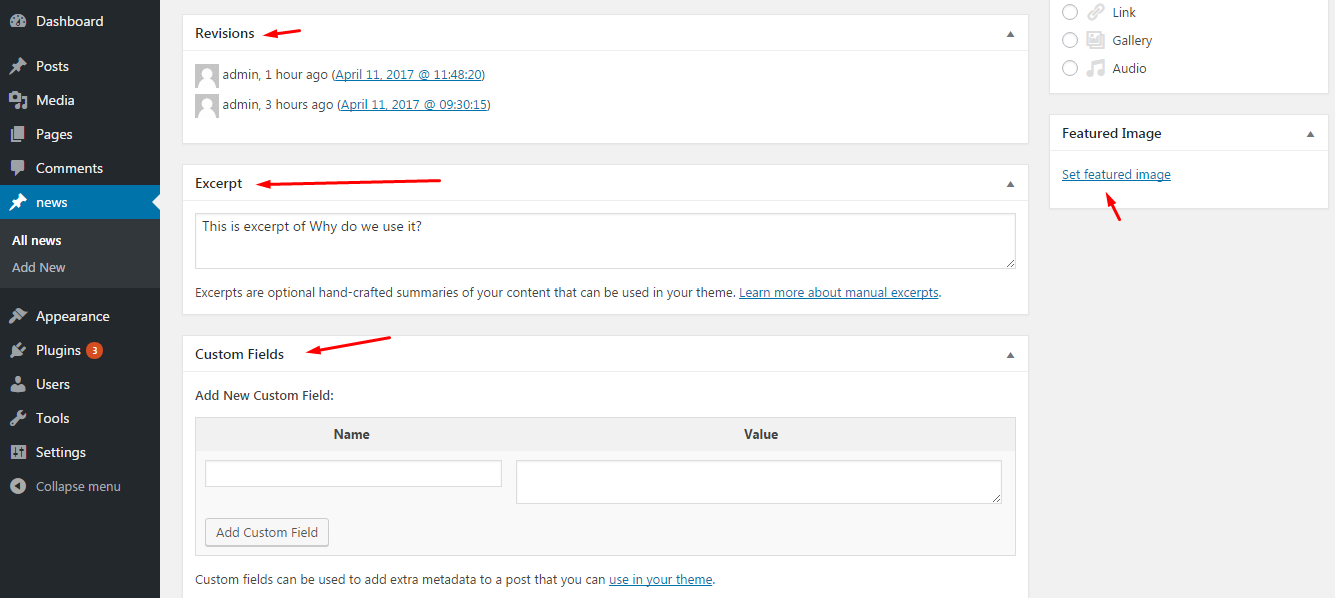
– After adding featuresThe steps above tell how to register WordPress custom post types to the backend of any theme. Now let’s learn how to add a custom post on a WordPress website.
How to Create a New Custom Post on a WordPress Website
You can create a new custom post on your WordPress website by following the steps below:
- Click the registered custom post type, which in our case is “News.”
- Click Add New.
- Type the title and body of your post.
- Type the excerpt, and set a featured image.
- Click the Publish button to take the new custom post live.
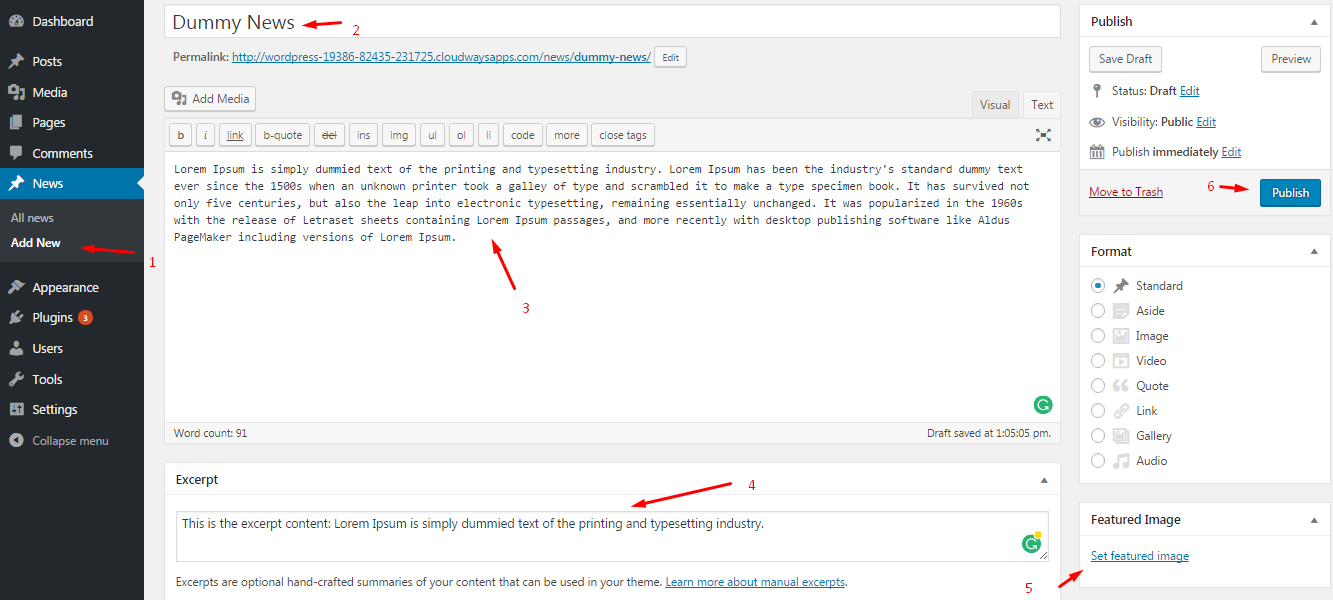
How to Create a Template and Fetching List
Creating a template and fetching a list requires creating a new file named template-news.php.
- Place the newly created file in your theme folder.
- Add the following code to the file:
- <?php
- /*Template Name: News*/
- get_header();
- query_posts(array(
- 'post_type' => 'news'
- )); ?>
- <?php
- while (have_posts()) : the_post(); ?>
- <h2><a href="<?php the_permalink() ?>"><?php the_title(); ?></a></h2>
- <p><?php the_excerpt(); ?></p>
- <?php endwhile;
- get_footer();
- ?>
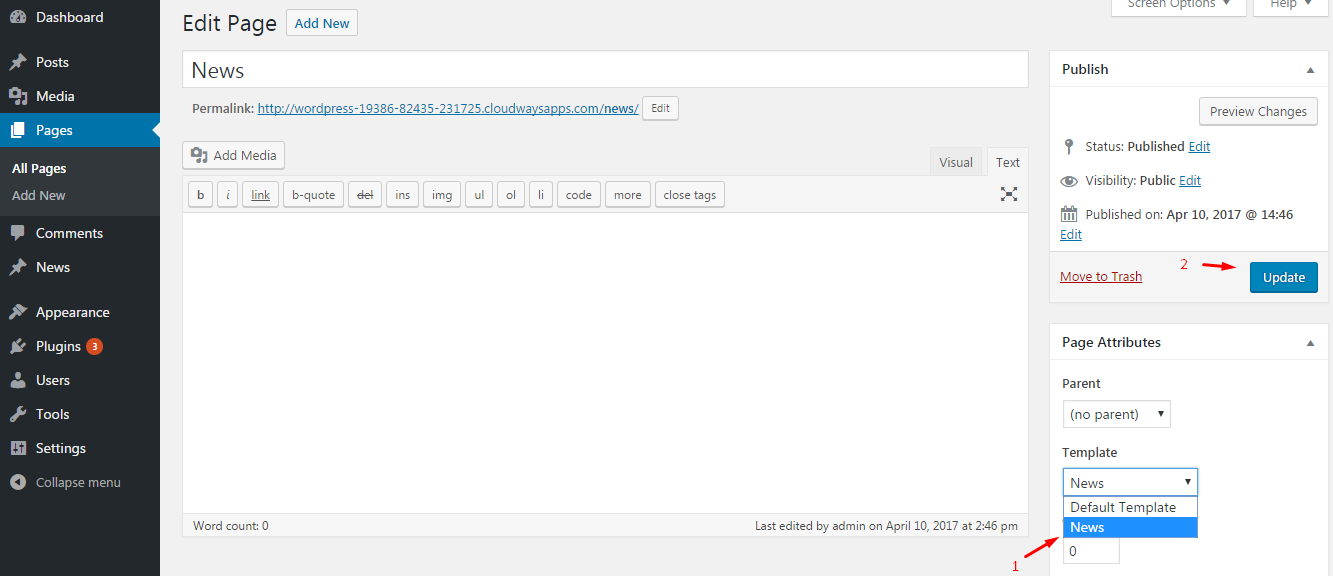
Select a Template
- Go to your WordPress dashboard
- Click Pages > Add New
- Create a new page named “News“
- Click Page Attributes on the right side and access the drop-down menu under Template
- Select the new template “News“
- Click the Update button to set your template
Refer to the image below for the visual representation of the above steps:
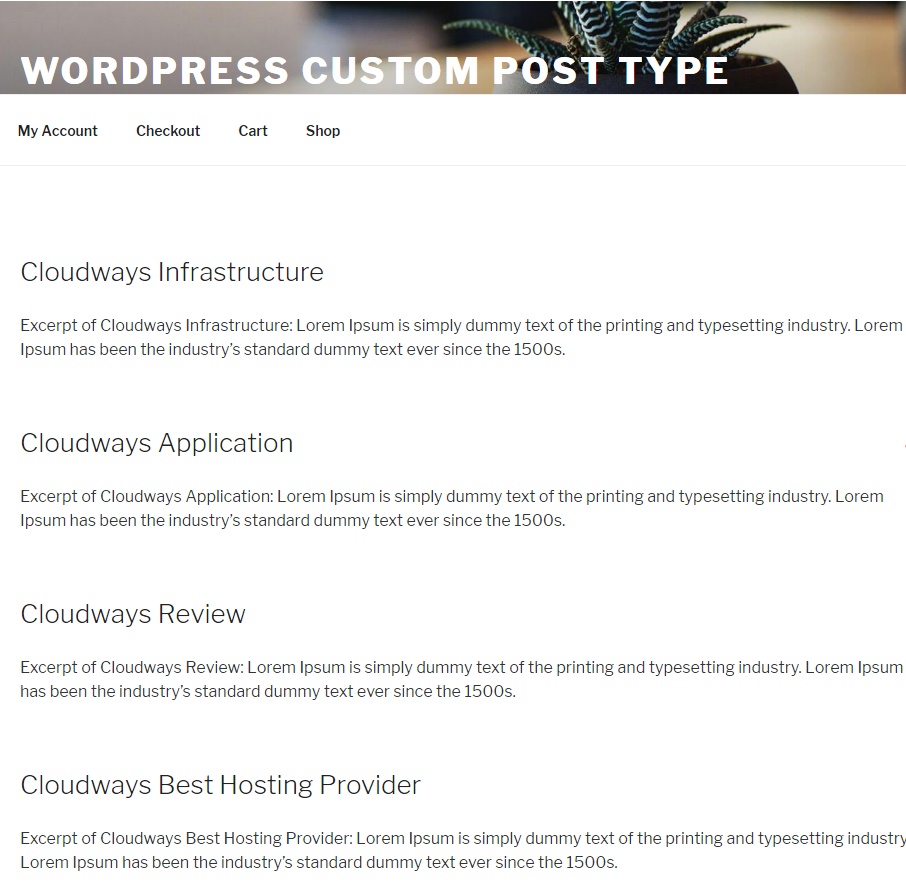
The image below represents the final display of your listing page:
How to Add Menu for Custom Post Type
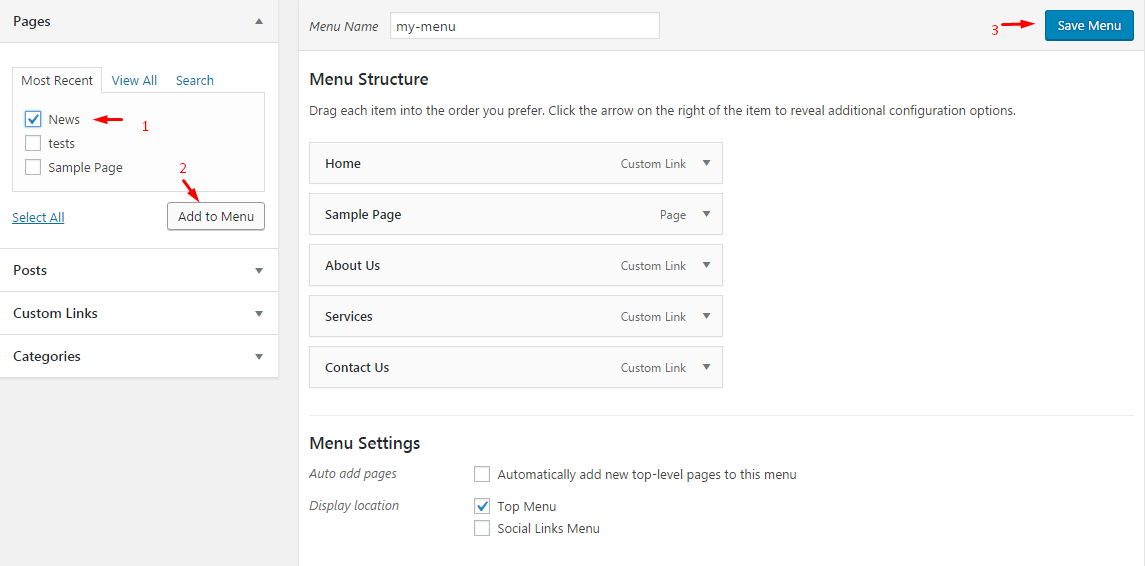
Add your custom post type as a part of the Menu options on your WordPress website by following the steps below:
- Go to your WordPress dashboard
- Navigate to Appearance > Menus
- Add the News page to your main menu to display a navigational link to our newly created WordPress custom post type, News
For further reference, check out the image below.
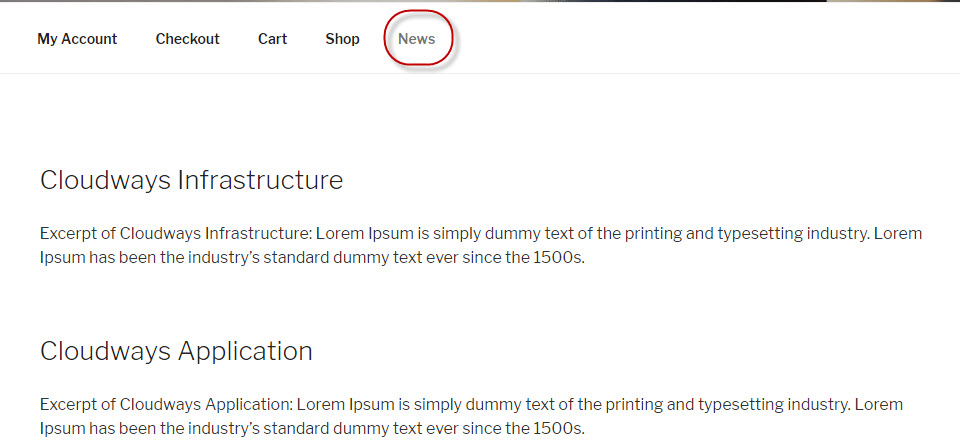
And this is how your website will look on the front end. Check out the image below:
How to Create a Detail Page for Custom Post Type
Create a “detail” page for custom post type by following the steps below:
- Add a new file called single-news.php (located in your WordPress theme)
- Add the following code to the file:
- <?php
- get_header();
- /* Start the Loop */
- while (have_posts()) : the_post();
- get_template_part('template-parts/post/content', get_post_format());
- endwhile; // End of the loop.
- get_footer();
- ?>
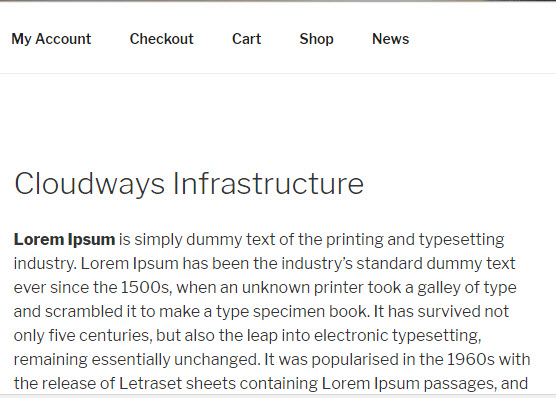
Now it’s time to see what your detail page looks like:
Wrapping Up!
You have now learned how to create a Custom Post Type in WordPress, which is quite complex but can be easily done by following the steps mentioned in this blog. Check out our other blog posts for more helpful guides on managing your WordPress site, such as reducing WordPress load times. Shall you have any queries or suggestions regarding the blog, feel free to comment below.
Comments
Post a Comment